A comprehensive guide to setting up all essential mail security features for ProtonMail using a free Cloudflare plan. Credits: AnalogManDigitalKid’s Complete ProtonMail Custom Domain Security Setup with Cloudflare
Table of Contents
- Overview
- Prerequisites
- Security Features Covered
- Setup Instructions
- Testing Your Setup
- Troubleshooting
- Credits
Overview
This tutorial will help you configure advanced email security features for your ProtonMail custom domain using Cloudflare’s free plan. These features significantly improve email security, deliverability, and provide detailed reporting on potential abuse attempts.
Prerequisites
- Domain configured with Cloudflare nameservers (registrar can be elsewhere)
- ProtonMail custom domain already set up and working
- Basic familiarity with DNS record management
- Cloudflare account (free plan sufficient)
Security Features Covered
| Feature | Purpose | Difficulty |
|---|---|---|
| SPF | Prevents email spoofing by defining authorized senders | Easy |
| DKIM | Cryptographically signs emails to verify authenticity | Easy |
| DMARC | Policy framework that uses SPF and DKIM for email authentication | Easy |
| DNSSEC | Secures DNS queries against tampering | Easy |
| DANE | Binds TLS certificates to domain names via DNS | Easy |
| CAA | Controls which Certificate Authorities can issue certificates | Easy |
| MTA-STS | Enforces TLS encryption for email transport | Advanced |
| TLS-RPT | Provides reports on TLS connection failures and MTA-STS policy enforcement | Advanced |
| WKD | Enables automatic PGP key discovery | Advanced |
Setup Instructions
1. SPF (Sender Policy Framework)
SPF prevents other people from sending emails on behalf of your domain by defining which servers are authorized to send email.
DNS Record to Create:
| Type | Host | Value |
|---|---|---|
| TXT | @ | v=spf1 include:_spf.protonmail.ch -all |

For multiple email services, include additional domains:
v=spf1 include:_spf.protonmail.ch include:spf.example.com -all
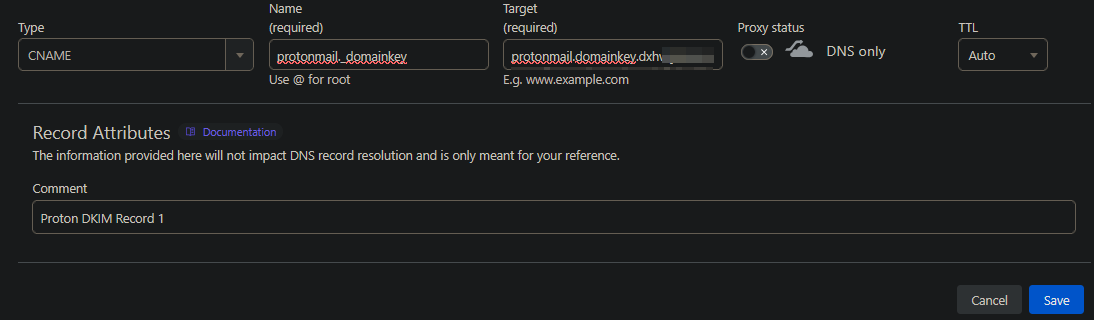
2. DKIM (DomainKeys Identified Mail)
DKIM adds a digital signature to your emails that receiving servers can verify.
DNS Records to Create:
| Type | Host | Value | Proxy |
|---|---|---|---|
| CNAME | protonmail._domainkey | <proton domain key 1> | Disabled |
| CNAME | protonmail2._domainkey | <proton domain key 2> | Disabled |
| CNAME | protonmail3._domainkey | <proton domain key 3> | Disabled |
Note: Get your specific ProtonMail DKIM values from your ProtonMail domain settings.


3. DMARC (Domain-based Message Authentication, Reporting & Conformance)
DMARC uses SPF and DKIM to determine what happens to emails that fail authentication.
DNS Record to Create:
| Type | Host | Value |
|---|---|---|
| TXT | _dmarc | "v=DMARC1; p=reject; sp=reject; pct=100; adkim=s; aspf=s; fo=1; ri=86400; ruf=mailto:example@example.com" |
Note: Specify instead of example email your own. If you do not want to get reports, you can remove ruf part from the record.

Enable DMARC Management in Cloudflare:
- Navigate to: Your domain > Email > DMARC Management
- Enable DMARC management
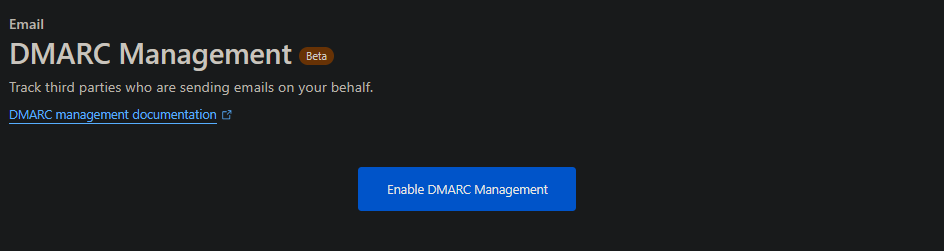
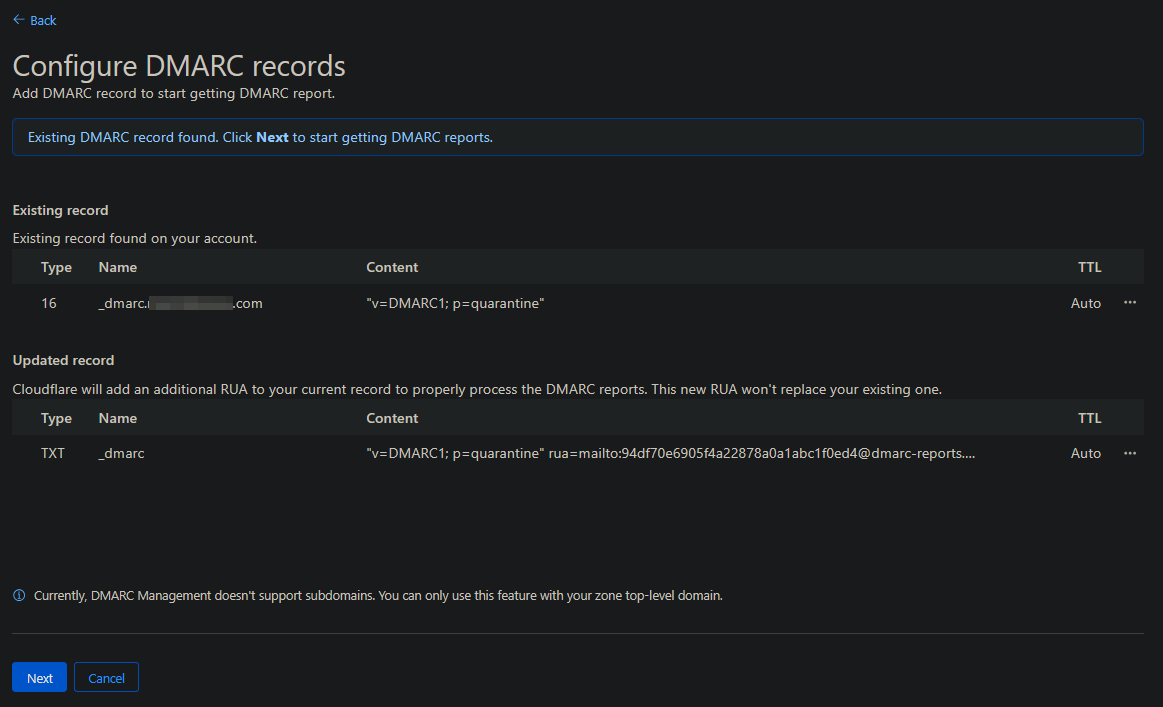
- Click Next and allow the updates
This enables you to receive reports when emails are quarantined by DMARC policies.
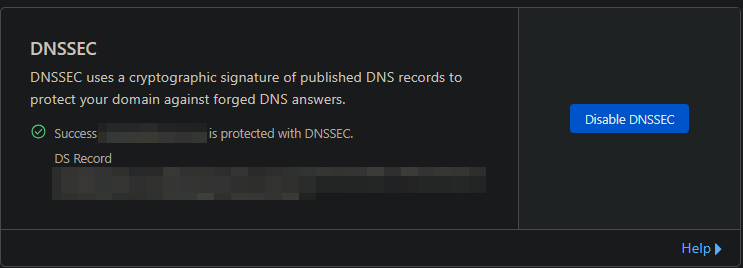
4. DNSSEC and DANE
DNSSEC secures DNS queries, and DANE binds TLS certificates to domain names. To enable DANE on ProtonMail, simply enable DNSSEC.
Steps:
- Navigate to: Account Home > Domain Registration > Manage Domains > Your Domain > Manage > Configuration
- Enable DNSSEC
5. CAA (Certification Authority Authorization)
CAA records specify which Certificate Authorities are authorized to issue certificates for your domain.
DNS Records to Create:
CAA (Certificate Authority Authorization) records allow a domain owner to specify which Certificate Authorities (CAs) are permitted to issue certificates for their domain. They help prevent unauthorized or fraudulent SSL/TLS certificate issuance.
In your setup you are adding two specific CAA records:
| Type | Host | Value | Purpose |
|---|---|---|---|
| CAA | @ | 0 issuemail ; | Explicitly blocks issuance of S/MIME (email) certificates by any CA. This ensures that no Certificate Authority is allowed to issue email-related certificates for your domain unless you add additional authorized ones. |
| CAA | @ | 0 iodef mailto:me@example.com | Provides an email address where CAs can send reports if someone attempts to request an unauthorized certificate (either email or SSL). This allows you to be notified of suspicious activity. |


Note: After you add your custom CAA records, Cloudflare automatically inserts additional CAA entries for the Certificate Authorities it uses to issue SSL certificates for your domain (e.g., Let’s Encrypt, Google Trust Services, or other CAs Cloudflare partners with). This happens because Cloudflare manages your TLS certificates, and it must ensure that its authorized CAs are allowed to issue certificates for your domain. Note, these entries will not appear in your Cloudflare DNS dashboard. This is expected behavior—Cloudflare manages those records internally to ensure its certificate authorities (such as Let’s Encrypt or Google Trust Services) remain authorized.
6. MTA-STS and TLS-RPT
MTA-STS enforces TLS encryption for email transport, while TLS-RPT provides reporting on TLS connection issues.
Goal: Create a Cloudflare worker to handle and serve MTA-STS.txt policy files for multiple domains.
Step 1: Create the Worker
- Navigate to Account Home > Compute (Workers) > Workers & Pages
- Create a new worker
- Choose “Start with Hello World!” and name it “MTA-STS”
- Deploy the worker
Step 2: Configure the Worker Code
Click Edit code and use the following:

// This worker is designed to handle MTA-STS policies for multiple domains.
// Make a new worker with this script and add your domains to the stsPolicies dict like the example.
// Add a DNS AAAA record for mta-sts.yourdomain.com pointing to 100:: and set to proxied,
// then add a workers route for mta-sts.yourdomain.com/* pointing to this worker.
// You'll still need to manually add the appropriate _mta-sts.yourdomain.com TXT record to enable the policy,
// and the _smtp._tls.yourdomain.com TXT record for reporting.

const stsPolicies = {
  "example1.com":
`version: STSv1
mode: enforce
mx: mail.protonmail.ch
mx: mailsec.protonmail.ch
max_age: 86400`,
  "example2.com":
`version: STSv1
mode: enforce
mx: mail.protonmail.ch
mx: mailsec.protonmail.ch
max_age: 86400`,
}

const respHeaders = {
  "Content-Type": "text/plain;charset=UTF-8"
}

addEventListener("fetch", event => {
  event.respondWith(handleRequest(event.request))
})

async function handleRequest(request) {
  const reqUrl = new URL(request.url)

  if (!reqUrl.hostname.startsWith("mta-sts.")) {
    return new Response(`Incorrect worker route. mta-sts policies must be served on the mta-sts subdomain
`, {status: 500, headers: respHeaders})
  }

  const policyHost = reqUrl.hostname.slice(8)

  if (!stsPolicies.hasOwnProperty(policyHost)) {
    return new Response(`${policyHost} is not defined in the mta-sts worker
`, {status: 500, headers: respHeaders})
  }

  if (reqUrl.protocol !== "https:" || reqUrl.pathname !== "/.well-known/mta-sts.txt") {
    reqUrl.protocol = "https:"
    reqUrl.pathname = "/.well-known/mta-sts.txt"
    return Response.redirect(reqUrl, 301)
  }

  return new Response(stsPolicies[policyHost] + "
", {status: 200, headers: respHeaders})
}
Configuration Notes:
- Replace
example1.comandexample2.comwith your actual domains - Add more domains by copying the policy block
- Set
mode: enforce(production) ormode: testing(for initial setup)
For SimpleLogin domains:
  "example3.com":
`version: STSv1
mode: enforce
mx: mx1.simplelogin.co
mx: mx2.simplelogin.co
max_age: 86400`,
Deploy the worker after making changes.
Step 3: Configure Worker Routes
In the worker, navigate to Settings > Domains & Routes
For each domain, add a route:
- Zone:
example.com - Route:
mta-sts.example.com/* - Failure mode: fail closed
Step 4: Configure WAF Rules
On each domain, navigate to Security > WAF > Custom rules
- Create rule named “Disabling Browser Integrity Check for MTA-STS”
- Click “edit expression” and paste:
(http.request.full_uri wildcard "https://mta-sts.example.com/*") or (http.host eq "mta-sts.example.com") or (http.request.full_uri eq "https://mta-sts.example.com/")
- Replace
example.comwith your domain - Choose action: Skip
- Click “More components to skip” and select Browser Integrity Check
- Keep order as Last
- Deploy
Step 5: Configure Rules
On each domain, navigate to Rules > Overview
- Click Create rule > Configuration Rule named “Disabling Browser Integrity Check for MTA-STS”
- Click “edit expression” and paste the same expression as Step 4
- Replace
example.comwith your domain - Click Add next to “Browser Integrity Check” and turn the slider to disabled
- Keep order as Last
- Deploy
Step 6: Create DNS Records
For each domain, create these DNS records:
| Type | Host | Value | Proxy |
|---|---|---|---|
| AAAA | mta-sts | 100:: | Enabled |
| TXT | _mta-sts | v=STSv1; id=xxxxxxxxxx | N/A |
| TXT | _smtp._tls | v=TLSRPTv1; rua=mailto:postmaster@example.com | N/A |
| TXT | mta-sts | v=spf1 -all | N/A |
| MX | mta-sts | . | N/A |
Important Notes:
- Replace
xxxxxxxxxxwith current epoch timestamp from https://www.epochconverter.com/ - Replace
postmaster@example.comwith your email for TLS-RPT reports - The
idmust be changed whenever you modify the MTA-STS policy in the worker
Note: MTA-STS cannot be set up for subdomains (e.g.,
mail.example.com) on Cloudflare’s free plan, as multi-level subdomains do not receive free SSL certificates. Setting up MTA-STS formail.example.comwould require an SSL certificate coveringmta-sts.mail.example.com, which requires a paid Cloudflare plan or custom SSL certificate. More info here: https://developers.cloudflare.com/ssl/edge-certificates/additional-options/total-tls/error-messages/#active-domains
7. WKD (Web Key Directory)
WKD enables automatic discovery of PGP public keys, making encrypted email easier to use.
Step 1: Create the Worker
- Navigate to Account Home > Compute (Workers) > Workers & Pages
- Create a new worker
- Choose “Start with Hello World!” and name it “Proton-WKD”
- Deploy the worker
Step 2: Configure the Worker Code
Click Edit code and use the following:
// 1. Create a worker in the dashboard and paste the following code into it
// 2. Replace all references to example.com to your domain, add more domains if needed
// 3. Deploy the worker
// 4. Setup routes in the dashboard for:
//    - example.com/.well-known/openpgpkey/*
//    - openpgpkey.example.com/.well-known/openpgpkey/*
//    - (apply above for additional domains too)
// 5. For each domain create these two DNS record
//    -     Type    Name         Value       Proxy
//    -     A       @            192.0.2.1   proxied  - this IP can be anything including your normal A record, it just needs to be proxied to work
//    -     CNAME   openpgpkey   @           proxied
// 6. If a domain does not host a website at the root A record (aka you set the IP to 192.0.2.1), then add a route inside the block-homepage-traffic worker.
// 7. Verify that it is working with https://metacode.biz/openpgp/web-key-directory
//    - Use these instead: https://wkd.dp42.dev (open-source) or webkeydirectory.com (proprietary)

export default {
  async fetch(request, env, ctx) {
    const url = new URL(request.url);
    switch (url.hostname) {
      case 'example1.com':
//    case 'example2.org':
        return await handleRoot(request, url);
      case 'openpgpkey.example1.com':
//    case 'openpgpkey.example2.org':
        return await handleSubdomain(request, url);
      default:
        return await fetch(request);
    }
  },
};

async function handleRoot(request, url) {
  const lastSegment = url.pathname.split("/").pop();
  let newUrl;
  if (lastSegment === "policy") {
    newUrl = "https://api.protonmail.ch/.well-known/openpgpkey/" + url.hostname + "/policy";
  } else {
    newUrl = "https://api.protonmail.ch/.well-known/openpgpkey/" + url.hostname + "/hu/" + lastSegment + url.search;
  }
  const protonResponse = await fetch(newUrl, request);
  const alteredResponse = new Response(protonResponse.body, protonResponse);
  alteredResponse.headers.set("Access-Control-Allow-Origin", "*");
  return alteredResponse;
}

async function handleSubdomain(request, url) {
  const newUrl = "https://api.protonmail.ch" + url.pathname + url.search;
  const protonResponse = await fetch(newUrl, request);
  const alteredResponse = new Response(protonResponse.body, protonResponse);
  alteredResponse.headers.set("Access-Control-Allow-Origin", "*");
  return alteredResponse;
}
Replace all references to example1.com with your domain and add more domains if needed.
Deploy the worker.
Step 3: Configure Worker Routes
In the worker, navigate to Settings > Domains & Routes
For each domain, add these routes:
Route 1:
- Zone:
example.com - Route:
example.com/.well-known/openpgpkey/* - Failure mode: fail closed
Route 2:
- Zone:
example.com - Route:
openpgpkey.example.com/.well-known/openpgpkey/* - Failure mode: fail closed
Step 4: Create DNS Records
For each domain, create these DNS records:
| Type | Host | Value | Proxy |
|---|---|---|---|
| A | @ | 192.0.2.1 | Enabled |
| CNAME | openpgpkey | @ | Enabled |
| MX | openpgpkey | . | N/A |
| TXT | openpgpkey | v=spf1 -all | N/A |
Notes:
- The A record value can be any IP address, including your actual web host
192.0.2.1is a non-routable IP if you don’t host a website- The proxy setting is required for Cloudflare to intercept and route traffic
- MX and TXT records required for protecting subdomain from spoofing
Step 5: Block Homepage Traffic (Optional)
If you don’t host a website at your domain root, create a worker to prevent timeout errors:
- Navigate to Account Home > Compute (Workers) > Workers & Pages
- Create a new worker named “Block-homepage-traffic”
- Deploy and edit with this code:
export default {
  async fetch(request) {
    const url = new URL(request.url);
    if (url.pathname === "/" || url.pathname === "") {
      return new Response('Not Found', {
        status: 404,
        headers: {
          'Content-Security-Policy': "default-src 'none'; frame-ancestors 'none';",
          'X-Content-Type-Options': 'nosniff',
          'X-Frame-Options': 'DENY',
          'X-XSS-Protection': '0',
          'Referrer-Policy': 'no-referrer'
        }
      });
    }
    return await fetch(request);
  }
}- Add routes for domains without websites:
- Zone:
example.com - Route:
example.com/* - Failure mode: fail closed
- Zone:
Testing Your Setup
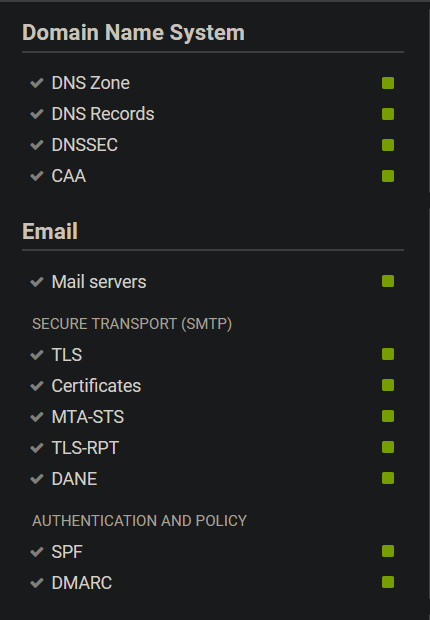
Comprehensive Security Analysis
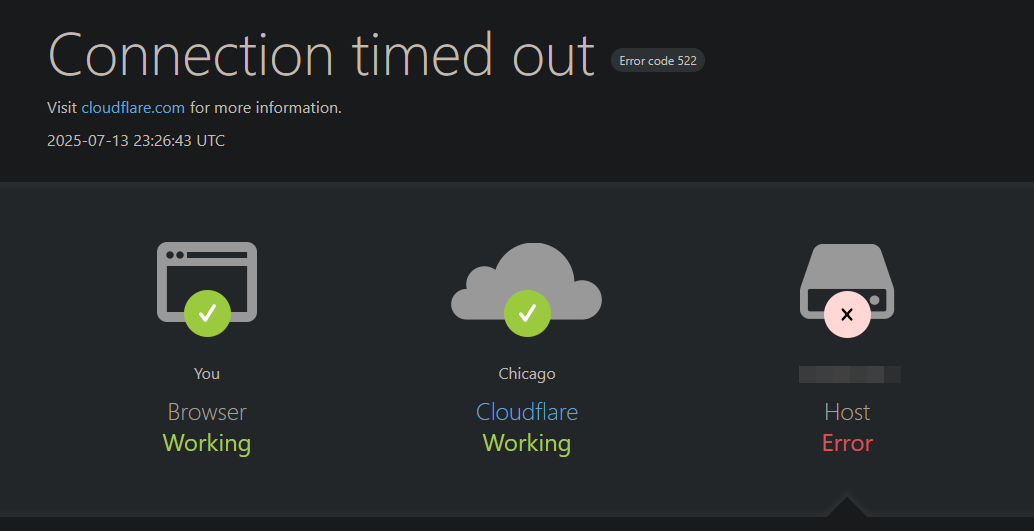
Visit https://www.hardenize.com/ and search your domain. You should see all security features properly configured:
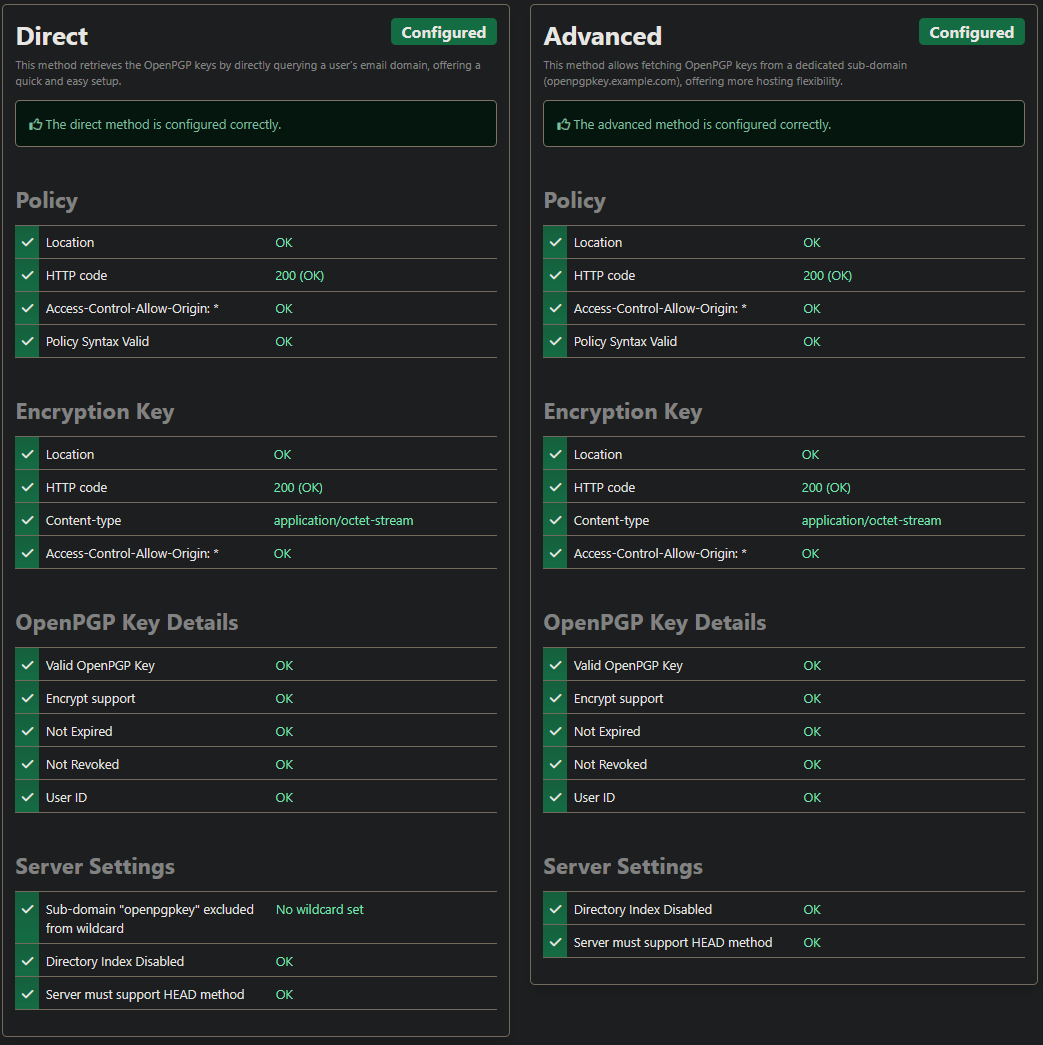
WKD Testing
Test Web Key Directory functionality:
- Open Source:
https://wkd.chimbosonic.com/https://wkd.dp42.dev - Proprietary: https://www.webkeydirectory.com/
Enter an email address with your custom domain:

DMARC Reports
Monitor your Cloudflare DMARC management dashboard for authentication reports and any potential abuse attempts.
Troubleshooting
Common Issues
MTA-STS not working:
- Verify the worker route matches exactly:
mta-sts.yourdomain.com/* - Check that the AAAA record has the proxy enabled
- Test that
https://mta-sts.yourdomain.com/.well-known/mta-sts.txtreturns content
WKD not working:
- Confirm both routes are configured correctly
- Verify DNS records have proxy enabled
Worker errors:
- Check browser developer tools for JavaScript errors
- Verify domain names in worker code match your actual domains
- Ensure WAF and Configuration rules are properly set
DNS propagation:
- Allow up to 24-48 hours for DNS changes to propagate globally
- Use online DNS checkers to verify records are visible
Getting Help
If you encounter issues:
- Check the original sources credited below for community discussions
- Verify each step was completed exactly as described
- Test individual components before moving to the next feature
- Use the testing tools to identify which specific feature isn’t working
Credits
This guide compiles various community contributions and best practices:
- MTA-STS Worker: Tugzrida’s Cloudflare Worker script
- WKD Worker: Yrlish’s ProtonMail WKD implementation and accompanying Gist
- Configuration: Best practices from ProtonMail documentation and email security standards
The goal is to provide a comprehensive, single-source tutorial for the ProtonMail community.
Disclaimer: This tutorial is provided as-is for educational purposes. Always test configurations in a non-production environment first, and ensure you understand the security implications of each feature before deployment.